Hadoop 다운로드

Apache Hadoop에 들어가서 binary로 들어간다
http의 링크 복사하고 리눅스에서 wget 명령어로 hadoop을 다운로드 받는다
tar.gz 를 압축 해제하는 명령어
tar -zxvf [압축 파일명]java 다운로드
hadoop 3.3.x 버전은 java 8이랑 11 버전만 가능!
java 11 버전을 다운로드 받는다. jdk-11.0.21이 root에 오게 파일 위치 변경해야함
JAVA 환경변수 설정
/root/.bashrc 파일 수정
export JAVA_HOME=/root/jdk-11.0.21
export PATH=$JAVA_HOME/bin:$PATH
수정된 파일 적용하려면 source /root/.bashrc
수정 완료!
Hadoop 환경변수 설정
[root@localhost ~]# gedit hadoop-3.3.6/etc/hadoop/hadoop-env.sh[root@localhost ~]# gedit ./hadoop-3.3.6/etc/hadoop/core-site.xmlhdfs-site.xml 수정
[root@localhost ~]# ssh localhost
[root@localhost ~]# exit
로그아웃
키 생성
[root@localhost ~]# ssh-keygen -t rsa -P '' -f ~/.ssh/id_rsa[root@localhost ~]# cat ~/.ssh/id_rsa.pub >> ~/.ssh/authorized_keys
[root@localhost ~]# chmod 0600 ~/.ssh/authorized_keys
[root@localhost ~]# ssh localhost
Activate the web console with: systemctl enable --now cockpit.socket
Last login: Tue Mar 5 10:49:18 2024 from ::1이제 password 치지 않고 로그인 가능
namenode format
[root@localhost ~]# ./hadoop-3.3.6/bin/hdfs namenode -formatdfs 실행
[root@localhost ~]# ./hadoop-3.3.6/sbin/start-dfs.sh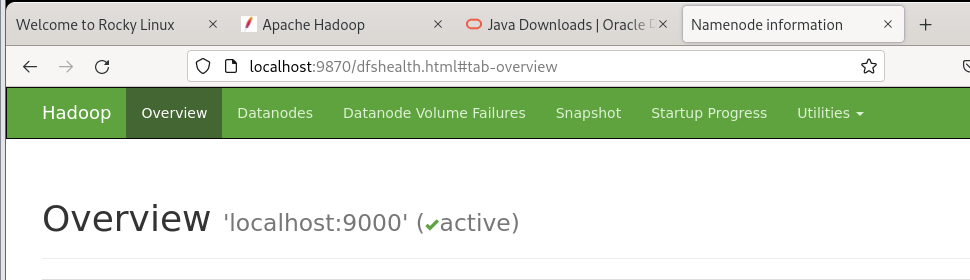
웹사이트에서 실행되면 성공!
[root@localhost ~]# gedit hadoop-3.3.6/etc/hadoop/mapred-site.xml
[root@localhost ~]# gedit hadoop-3.3.6/etc/hadoop/yarn-site.xml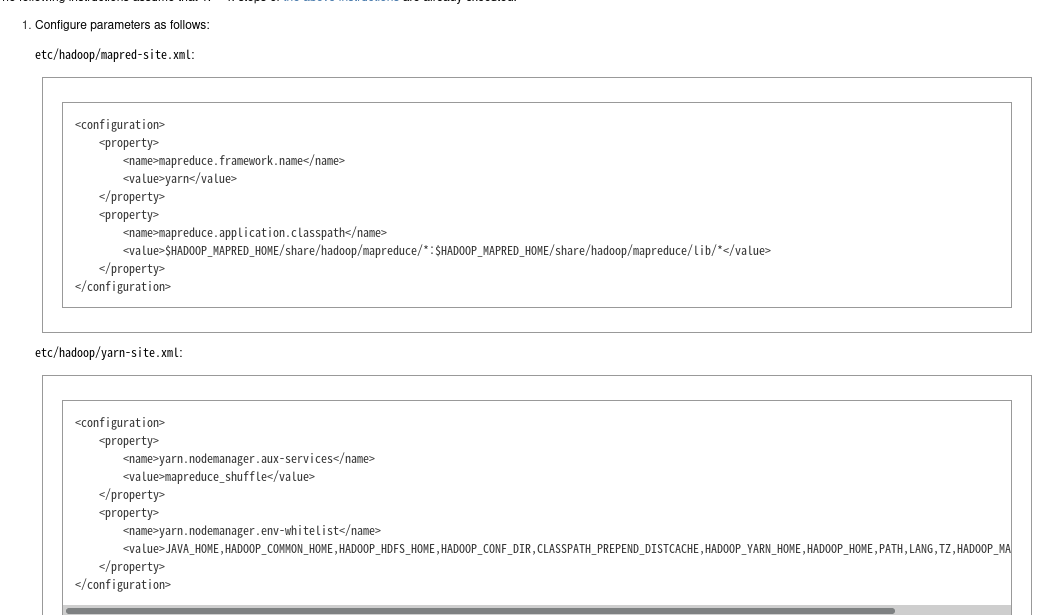
Hadoop 공식문서 참고해서 수정하기
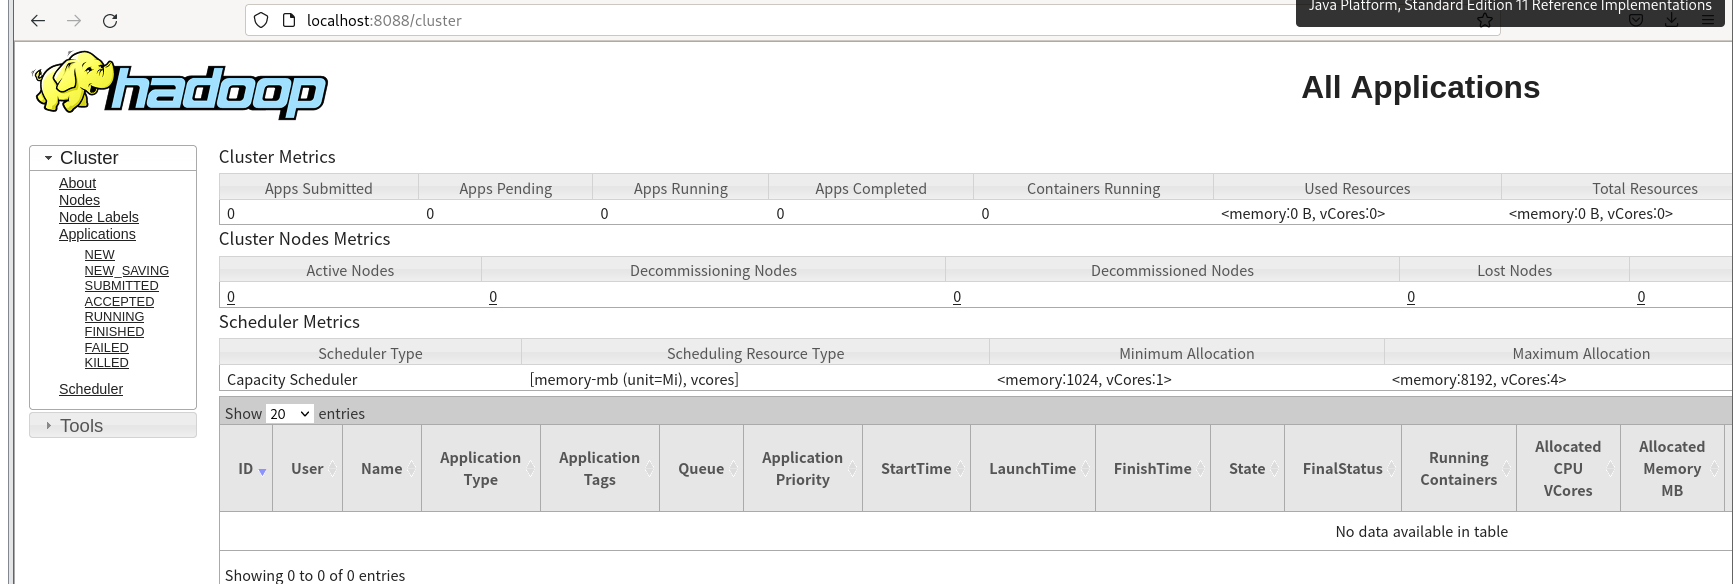
[root@localhost ~]# ./hadoop-3.3.6/sbin/start-yarn.shlocalhost:8088/cluster 접속하면
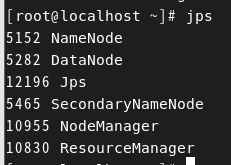
[root@localhost ~]# hadoop-3.3.6/sbin/start-all.shdfs와 yarn 모두 실행 가능
https://hadoop.apache.org/docs/stable/hadoop-project-dist/hadoop-common/SingleCluster.html
Apache Hadoop 3.3.6 – Hadoop: Setting up a Single Node Cluster.
<!--- Licensed under the Apache License, Version 2.0 (the "License"); you may not use this file except in compliance with the License. You may obtain a copy of the License at http://www.apache.org/licenses/LICENSE-2.0 Unless required by applicable law or a
hadoop.apache.org
Execution
나의 input 경로 : /user/hadooptest
나의 output 경로 : /user/hadooptest/output
[root@localhost hadoop-3.3.6]# bin/hdfs dfs -mkdir -p /user/hadooptest
[root@localhost hadoop-3.3.6]# bin/hdfs dfs -put etc/hadoop/*.xml /user/hadooptest
[root@localhost hadoop-3.3.6]# bin/hadoop jar share/hadoop/mapreduce/hadoop-mapreduce-examples-3.3.6.jar
grep /user/hadooptest/ /user/hadooptest/output 'dfs[a-z.]+'
[root@localhost hadoop-3.3.6]# bin/hdfs dfs -cat /user/hadooptest/output/*
1	dfsadmin
1	dfs.replication
[root@localhost hadoop-3.3.6]# bin/hdfs dfs -get /user/hadooptest/output ../hdfs
etc/hadoop/*.xml를 input 파일 경로인 /user/hadooptest에 넣기
/user/hadooptest/ 에 있는 input 파일에서 'dfs[a-z.]+'에 해당하는 것들을 /user/hadooptest/output 에 저장
-cat 명령을 통해 저장된 내용 확인!
결과

'Data Engineering > Hadoop' 카테고리의 다른 글
| [Hadoop] MapReduce 실행 중 Error: org.apache.hadoop.hdfs.BlockMissingException (0) | 2024.03.27 |
|---|---|
| [Hadoop] Hadoop Streaming (0) | 2024.03.07 |
| [Hadoop] Python으로 MapReduce 구현하기 (1) | 2024.03.07 |
| [Hadoop] Java로 MapReduce 구현하기 (1) | 2024.03.06 |
| [Hadoop] hdfs 명령어 정리 및 실행 (0) | 2024.03.06 |


